Another
important use of zones in Unreal is the Skyzone. Building a skybox is something you
need to know. A Skybox acts as your backdrop in your level. Duke Nukem 3D for
example used one parallaxed texture for a background. That method gives a very flat
look and allows for very little detail. In Unreal, you build your backdrop like you
would any other area of your level. A skybox is simply a zone by itself that is
classified as a skyzone via adding a SkyZoneInfo class inside the zone. Any surfaces
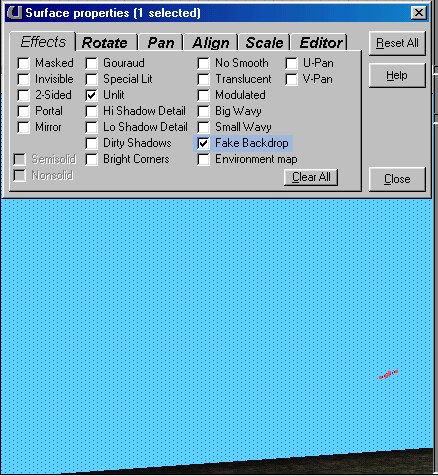
you select as Fake Backdrop under Surface Properties will show this backdrop. The
view will be from where you place the SkyZoneInfo...

Give a surface the Fake
Backdrop property and it will show as your skybox in the game
How to go about it?
Building a Skybox
Its quite simple. Build an area totally
separate from the rest of your level. You don't want this to be connected to your
level in any way, since this is a backdrop. Like I explained before, Unreal will
automatically know that this is a separate zone.

Build your skybox separate from
your level
Now there is an art to making a good backdrop
for your level. I can't really explain it though. Basically you just have to
use your own judgement, as you are trying to make something that looks like a believeable
backdrop. Once you play your level with a skybox a couple of times, you should see
how it works. Basically its like a camera is where you put the SkyZoneInfo class,
and you have to make a realistic looking surrounding for it. There are some basic
things that people do in Unreal skyboxes, like use the backdrop mountains in the ShaneSky,
ShaneDay, SkyBox, etc. texture sets... Add them as masked sheets. Take a look
at the skybox in my example map at the end of this tutorial, or open up some of the maps
from Unreal and take a look at how they made their skyboxes...

My Skybox
Since you are just learning, you might want to
try something simple, like a simple cube textured with one of the cloud textures in
genfluid.utx... Anyway, all you have to do is make your skybox, then add in the
SkyZoneInfo where you want the "Camera" to be for the skyzone view. Any
surfaces you select "Fake Backdrop" for will show the skyzone once your map is
compiled, saved, and ran in game.

Select the SkyZoneInfo in the
Classes Browser

Add the SkyZoneInfo inside the
Skybox where you want the "Camera" to be
Compile your level and save it. Only in
the game can you actually see your skyzone. Heres a shot of the one I made for the
map you can download at the end of this tutorial.

In-game shot of my Skybox
That should atleast give you the gist of it.
One thing that people like to use a lot in skyboxes: Panning cloud textures -
Panning textures are easy, just select "U-Pan" or "V-Pan" in surface
properties. One problem however is that the default pan speed is WAY faster than you
would want it for clouds... You can set the panning speed for textures in a particular
zone in the "ZoneLight" properties. So, you would open the SkyZoneInfo's
properties, then open the "ZoneLight" section. There are two values,
"TexUPanSpeed" and "TexVPanSpeed" - Set these to change the panning
speed of the textures in your skyzone, or in any zone.

XZoneInfo Properties ->
ZoneLight
Now you know the basics of creating a skyzone,
atleast how it works. You will get better at creating things that actually look good
as skyboxes as you get better at editing, and learn advanced things...
There are other things you can do with zones
too, aside from skyboxes, water, and such. Read on to see more things you can use
zoning for... |
